hi guys... from 31 July 2011 I not posted anything as i am working on some new projects...n i will post about those things very soon.......tc
Saturday, 12 November 2011
Sunday, 31 July 2011
Control Modules
ControlModule Description Type
101LSH- 1 High Level Switch For Tank 101 DI
101LSL- 1 Low Level Switch For Tank 101 DI
201LSH- 1 High Level Switch For Tank 201 DI
201LSL- 1 Low Level Switch For Tank 201 DI
301LSH- 1 High Level Switch For Tank 301 DI
301LSL- 1 Low Level Switch For Tank 301 DI
101SOV- 1Inlet Valve For Tank 101 DO
201SOV- 1Inlet Valve For Tank 201 DO
301SOV- 1Inlet Valve For Tank 301 DO
101AV- 1 Outlet Valve For Tank 101 DO
201AV- 1 Outlet Valve For Tank 201 DO
301AV- 1 Outlet Valve For Tank 301 DO
401AV- 1 Inlet Valve For Tank 401 DO
401SOV- 1Outlet Valve Fine For Tank 401 DO
401AV- 2 Outlet Valve Coarse For Tank 401 DO
401M- 1 Agitator DOPUMP Pump DO
401LT- 1 Level Transmitter For Tank 401 AI
401TT- 1 Temperature Transmitter For Tank401 AI
STEAM Control Valve AO
Wednesday, 27 July 2011
Hardware
Batch Process : summary of hardware,already explained in earlier posts
The di erent hardware used in the Batch Process includes:
1. Tanks
2. Switches and Transmitters
3. Valves
4. DCS (DeltaV)
4.1.1 Tanks
All the tanks are made of stainless steel so to have corrosion free batch process.
The ingredient tanks have the following dimensions.
Overall Length - 950 mm
Diameter of tank- 550 mm
Capacity- 150 litres
The reactor tank has the following dimensions.
Overall Length - 1100 mm
Diameter of tank - 700 mm
Capacity - 350 litre
Batch reactor Instrumentation
Hi Friends,
up to now i shared structure of batch reactor and instrumentation regarding bottle filling section of batch reactor using B n R PLC.I also shared cable laying for instruments which are required on batch reactor.i am sure you are now waiting for the batch reactor instruments for which we done cable laying.
Here are the instruments which are mounted on batch reactor.
1.Solenoid valves are used to control the inflow into the three ingredient tanks.
These are inch line size and have direct 24V DC electrical actuation. They have
been fi tted to the tanks with appropriate barrel nipple and reducer assembly.
There are 3 solenoid valves which are mounted on the upper side of 3 tanks for ingredient inflow.
I want to mention one important thing that cable for these valves comes directly from DCS panel,there is single JB connection for these cables in process lab unlike other Multicore cables.
In case of failure:first check actuating supply to the coil,in our case its 24 V d.c. if not then,follow these steps-
a.cable connections,check cable continuity.
b.If cable continuity is OK,further check 24v dc from card, check also whether channel is enable or not in DCS.
c.If 24 v d.c is coming then may doubt on coil.
2.Angle valves with pneumatic actuators are used to control the ingredient
inflow into the reactor assembly. The actuators are electrically actuated with 230V AC supply controlled through DCS via a relay mechanism. These valves are also 3/4 inch line size and are specially designed to achieve better flow rates.
Cable connections from DCS to B n R panel into TB4 and further it goes to angle valves through relay.24 v dc coming from DCS and through relay 110 v ac or 130 v ac going to the coil depending on its specification.So when coil actuates,it gets magnetized and air supply enter into actuator and valves open.
Troubleshooting procedure same as that explained in angle valve,just check the coil procedure.( whole B n R panel picture should be uploaded soon,so u can check where is TB4 location )
3.Fi ne and coarse valve assembly is tted at the outlet of the reactor tank for bottle lling purpose using appropriate barrel nipple and reducer assembly.Note that these both valves get 24 v dc from b n R panel which is explained earlier.
4.switches and transmitters are mounted on each tank to provide high and
low level alarms for each tank as well as continuous level indication and control for the reactor tank section.these are as follows :
Tank 101: Conductivity Type Level Switch (HL and LL)
Tank 201:Displacer Switch (HL), Magnetic Float Switch (LL)
Tank 301:Capacitive Level Switch (HL), Vibrating Fork Switch (LL),
Ultrasonic Transmitter for continuous analog level reading.
Reactor :Capacitive Level Transmitter for reactor level measurement
Thursday, 7 July 2011
Batch process assembly
Hi Friends,
Up to now, we made you familiar what we want to do with our lab batch reactor pilot plant.Still we are here mentioning some points regarding process and batch reactor assembly so that we can know how many and which instruments we are using.We know the systems used are Delta v and B & R PLC.So check it process and instruments we are using :
1.The system consists of 4 tanks, three of which contain ingredients A, B and C
and has a maximum capacity of 150 liters each.
2.The mixing of the three ingredients takes place in the 4th tank which is the reactor tank. The reactor tank has a capacity of 350 liters. Reactor is provided with an agitator which is actuated by a 3 phase motor.Agitator is for mixing the ingredients.
3.The reactor tank is surrounded by a steam jacket around its periphery over a
height of 800mm.instruments are in next post
Friday, 17 June 2011
Batch reactor-Temparature tansmitter loading
Hi guys,
Our batch reactor in process lab has duplex type RTD.It placed at bottom side of reactor.Here is the problem reagrding same RTD and Transmitter while checking its loop From DCS to field.
Problem is:
take care........
Our batch reactor in process lab has duplex type RTD.It placed at bottom side of reactor.Here is the problem reagrding same RTD and Transmitter while checking its loop From DCS to field.
Problem is:
- Reactor temperature control module showing BAD device indication.It means either device is not connected or its not working
- Started with RTD checking.Measured resistance between 3 Terminal RTD and found it is ok at room temparature.
- Next we checked voltage comming from DCS to tansmitter.As it is duplex RTD we got 11.5 V and 13 V at both transmitter.so we decided to check the loop.
- Firstly in process lab upper junction box we checked cable continuity and we found it ok.Cable tag number 25/Ax AI/41 n so on...so from this we can esily found the same cable in DCS lab and for cross checking checked its continuity in JB.
- We found 24 V coming from DCS by rmoving cable from field instrument but when we were connecting same cable to transmteer voltage drop had occured so the module is showing device is not connected or failure as 24V loop is not completed.
- Now we are checking Transmitter ,so we can make conclusion why voltage drop occuring may be its because of transmitter load.
take care........
Thursday, 2 June 2011
Batch reactor
Hello....after a long break of our practical work because of our exams n presentations we were unable to post the recent interesting happenings in our batch reactor pilot plant....
Its not the meaning that we were not working on that..We worked on interesting concept of looping .I am saying interesting as it was done previously by the pilot plant developers.After some days the inlet valves are not working.
We found relay number 12 also not working....so we traced whole loop and finally found one bug in card channel which itself not producing 24 v DC.Now we changed card number and channel number.Now as relay number 12 is working he Inlet valve center one is working now.
Second problem i found when whole loop is ok but simple fuse in Marshalling cabinet is not working means just blown. we replaced it and checked ,the valve is working now.
U might think its a just routine maintenance problem but in our opinion if we are able to find those problems and we solve it then it clears our ideas of field instrumentation specifically...I already posted diagram of this batch reactor so you can check which valves were not working(inlet valves).
Relay card picture also posted in previous blog..
Thanks to all...
Tuesday, 17 May 2011


Sunday, 15 May 2011
Delta v explorer
we were busy in our exams and now we are back to work .....so here are some steps to become familiar with delta -v explorer
1.Open delta v explorer
2.If u want to create class based module then open library-go to control module class- wright click on it n say new module-finally name it and build the module like-analog input,analog output or digital input etc
3.den go to system configuration-control strategies-write click-create your area-open your ara n crate new module .
4 You can use the module which you crated in control module class above explained or you can crate new module here itself which is not class based ..
IMP question is-whether there is significance to use class based control module????
Wednesday, 20 April 2011

Delta v explorer
Following are the steps for making 'Control module class' and 'Area in control strategies' :
1. open delta v explorer
2.go to library
3.enter into advance definitions
4.there are many class like equipment module class,control module class,etc
5.right click on it n create new class-eg valve and open it with control studio and take whichever input you required.
Benefits: 1. if u need valve that is DO in area for many times then just darg valve from its class n rename it .
Steps for making area:
1. go to system configurations
2. enter into control strategies
3.right click and make new area.
eg-M-tech
Tuesday, 12 April 2011
Discussion regarding DCS and PLC in our case
1.DCS- master
2 PLC- slave
these combination we are going to use to run the plant.
- bottle filling application is on PLC which we are doing
- the major parr as tank level,temparature,mixture content,agitator,mass are controlled through DCS
-so suggest your control strategies.
-regarding basic information or quries post here
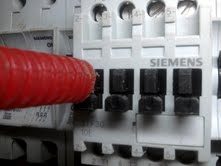
Conveyor running on B & R PLC
1.After sucessfuly testing of conveyor by taking its perticular contactor in delta mode manually..now it was time to check it through 24V DO out and relay.
2. Pannel layout is sucessfully done.so we can trace the command cables coming from DO card of B & R PLC through perticular relay.
3. When 24V dc is provided by making force on perticular relay,contactor changes from star to delta and 3 phase supply provided to motor.
4. All Digital Inputs (DI) are tested.They are as follows:
a. Limit switch
b. Proximity switch 1
c. Proximity switch 2
5.Angle valve is tested by providing 24vdc to solnoid coil.
6.Stopper- both cyilnder recive air through 5/2 pilot which pass air when solnoid coil energized by 230 V A.C. supply.It is given through another realy which is not present in panel.Tested it,found ok.
7. Now discussion is running on how should logic work,wheather conveyor should stop when bottle filling is there or it should be continously running.
Saturday, 26 March 2011
Testing of conveyor & agitator
On 24th march 2011 we tested conveyor and agitator by changing the contacts manually means without command from slave PLC. Steps are given below for our existing plant:
1.We traced out the proper wiring ,which MCB(Miniature circuit Breaker) is connected through contactor circuit .Wiring diagram will be soon displyed.
2. 3 cables from the motor are connected to contactor n contactor also got connected to cables from R2 ralay and NO ,NC contacts are 11 & 14 in our panel..
3.contactor has supply from the source through MCB.when operator gives command,command from realys comes to contactor and contacts cganged means star to delta & supply get connected to motor/agitator.This is the logic behind wiring diagram
4.This will more understand when we will disply the wiring diagram of our panel.
conveyor motor was 3 phase,so we have to check safety aspects while working in plants.
Thursday, 17 March 2011
Batch reactor daily progress report
1) SOV (Solenoid coil for double acting cylinder which acts as stopper for bottle |& lift the bottle for filling) tested by providing external 230 V A.C..Found OK.
2)Both Cylinders are working properly.
3)Master slave cable tracing done & proper termination done,its tagging is remaining.
Major work to be done in coming days:
1) Conveyor motion to be checked.
2) Limit switch checking
Procedure for checking proximity switch
1.Provide 24 v D.C. supply between 2wires ot of 3(in our case between brown & blue colur cable).
2. On proximity sensor it is clearly mentioned from which cable we get feedback (i.e. digital in) & whre we have to give 24 v DC.
3.Any metal at specific distance it cheks & gives the feedback..
2. On proximity sensor it is clearly mentioned from which cable we get feedback (i.e. digital in) & whre we have to give 24 v DC.
3.Any metal at specific distance it cheks & gives the feedback..
Wednesday, 16 March 2011
Batch process field work
Work done on 16/03/2011
1.Today we tested two proximity sensors which are used for position sensing of bottles on conveyor in batch process loop
2.we noted its connection in B & R PLC panel.
Work to be done :
1.Solenoid coil for air supply of double acting cylinder,if solnoid valve is working then by giving air supply we have to check both solnoid valves workining
(we can check both cylinder by giving direct air supply)
2.Conveyor checking
3. Limit switch
4.Master slave connection
Thursday, 24 February 2011
Monday, 21 February 2011
Flow Loop
21-2-2011
Today 7 of us gather in PI lab for testing of control valve V-2 (Single seated ) and V-1 (Double seated) and calibration of I/P converter.
 |
| Process Flow Loop |
I/P Calibration :- We have checked 3 I/P converter in which non of them have span adjustment screw. We have opened one of them and checked its assembly. But we don't get how to repair its span adjustment screw.
But one of them gives us 14.11 psi reading on "Digital manometer" for 20 mA from current source.So we have marked it with red coloured tape and marked "OK".
Control Valve Testing :- We have tested V-1 and V-2 (In above Dia.). Where V-1 is double seated valve and V-2 is single seated equal percentage type valve.
We have guided DPT wire in proper manner to the JB1 and we are going to purchase guiding clips for pneumatic signal lines.
We have removed one open wire from "JB1 rack no.1 connection no 9 and 10" and let it on JB1.
Subscribe to:
Comments (Atom)